博文
GNSS-IOT实现细节
||
一、传感器端配置
需要注意以下几个地方:
1)mqtt采用默认broker的host、port;
"intercom": {
"mqtt": {
"host": "127.0.0.1",
"port": 1883,
"keepAlive": 60,
"topic": "openadms",
"tls": false
}
}
ps:mqtt其实是将不同模块之间进行数据传递,不论是数据在串口、文件、还是服务器之间传递,均是通过mqtt实现。
2、云端服务器的host需要添加端口号;
"cloudExporter": {
"host": "http://192.168.31.44:443/",
"user": "openadms",
"password": "geovey",
"db": "cache.json",
"cache": "file"
}
ps:注意区分https和http,此处只能填写http。
HTTPS only works if your webserver provides a valid X.509 certificate. For intranet applications, you should stick to HTTP instead.
文件下载:cloud_gnss.json、demo.json
二、服务器端配置
1、安装postgresql并设置为远程访问模式
/etc/postgresql/12/main/postgresql.conf文件设置如下:
listen_addresses = '*' # use '*' for all
password_encryption = scram-sha-256 # md5 or scram-sha-256
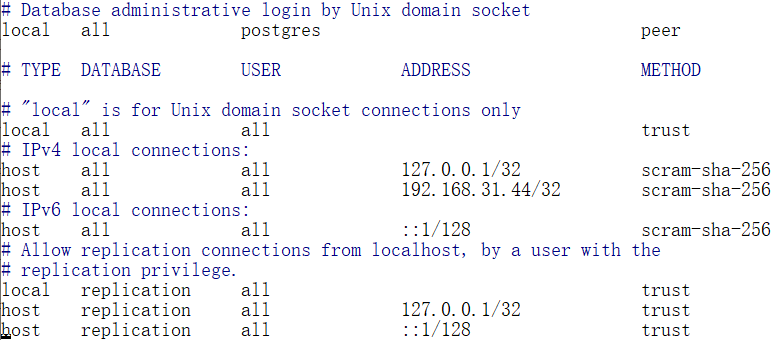
/etc/postgresql/12/main/pg_hba.conf文件设置如下:
然后重新启动postgresql服务:
$ sudo /etc/init.d/postgresql reload
之后根据openadms-server新建数据库和表结构(timeseries.sql)
$ psql -h localhost -U <username> -d timeseries -a -f psql/timeseries.sql
2、编译openresty(https://openresty.org/cn/)
过程参考网站:https://openresty.org/cn/installation.html
$ apt-get install libpcre3-dev libssl-dev perl make build-essential curl
$ tar -xzvf openresty-1.17.8.2.tar.gz
$ cd openresty-1.17.8.2/
$ ./configure --prefix=/opt/openresty \
--with-luajit \
--with-http_realip_module \
--with-http_iconv_module \
--with-http_postgres_module
ps:可以通过./configure --help查看更多信息
接下来开始make
$ sudo make
$ sudo make install
安装成功结束以后,通过下面命令查看一下Nginx所有模块,一定要包含如下几个模块:
- [form-input](https://github.com/calio/form-input-nginx-module)
- [headers-more](https://github.com/openresty/headers-more-nginx-module)
- [http-realip](http://nginx.org/en/docs/http/ngx_http_realip_module.html)
- [lua](https://github.com/openresty/lua-nginx-module)
- [postgres](https://github.com/FRiCKLE/ngx_postgres)
- [set-misc](https://github.com/openresty/set-misc-nginx-module)
$ sudo ./sbin/nginx -V
nginx version: openresty/1.17.8.2
built by gcc 5.5.0 20171010 (Ubuntu 5.5.0-12ubuntu1)
built with OpenSSL 1.0.2g 1 Mar 2016
TLS SNI support enabled
configure arguments: --prefix=/opt/openresty/nginx --with-cc-opt=-O2 --add-module=../ngx_devel_kit-0.3.1 --add-module=../echo-nginx-module-0.62 --add-module=../xss-nginx-module-0.06 --add-module=../ngx_coolkit-0.2 --add-module=../set-misc-nginx-module-0.32 --add-module=../form-input-nginx-module-0.12 --add-module=../encrypted-session-nginx-module-0.08 --add-module=../ngx_postgres-1.0 --add-module=../srcache-nginx-module-0.32 --add-module=../ngx_lua-0.10.17 --add-module=../ngx_lua_upstream-0.07 --add-module=../headers-more-nginx-module-0.33 --add-module=../array-var-nginx-module-0.05 --add-module=../memc-nginx-module-0.19 --add-module=../redis2-nginx-module-0.15 --add-module=../redis-nginx-module-0.3.7 --add-module=../rds-json-nginx-module-0.15 --add-module=../rds-csv-nginx-module-0.09 --add-module=../ngx_stream_lua-0.0.8 --with-ld-opt=-Wl,-rpath,/opt/openresty/luajit/lib --with-http_realip_module --with-stream --with-stream_ssl_module --with-stream_ssl_preread_module --with-http_ssl_module
3、配置Nginx
1)因为不是动态编译,所以把load_module都注释掉;
2)user可以改为计算机用户名(比如:chaoshu);
3)include地址改为本机实际的文件位置;
4)配置postgresql信息:
upstream postgresql {
postgres_server 192.168.31.44:5432 dbname=timeseries user=openadms password=geovey;
postgres_keepalive max=200 overflow=reject;
}
5)设置监听端口,这里的端口一定要和cloudExporter中host中的端口号一致;
server {
listen 443; # HTTP port. Change to 443 and add an X.509 certificate.
server_name 192.168.31.44; # CHANGE TO YOUR SERVER NAME!
}
文件下载:nginx.conf
配置完成以后,测试语法是否正确:
$ sudo ./sbin/nginx -t -c ./conf/nginx.conf
nginx: the configuration file /opt/openresty/nginx/./conf/nginx.conf syntax is ok
nginx: configuration file /opt/openresty/nginx/./conf/nginx.conf test is successful
文件没有问题以后,正式启动服务:
$ sudo ./sbin/nginx -c ./conf/nginx.conf
三、浏览器测试


数据都是以json格式传输和存储!
https://wap.sciencenet.cn/blog-858128-1249759.html
上一篇:mqtt - Publishing message failed: no connection
下一篇:json.decoder.JSONDecodeError: Extra data: line 1 column 1721